The perfect recipe for those who love fresh sourdough but lack the time, or patience, for the traditional method. This beginner-friendly approach simplifies the process without sacrificing quality.
I ADORE sourdough and have been making it for years, but for the last couple of years, I’ve exclusively used my stand mixer. And honestly? I haven’t noticed a difference in taste, shape, or texture. If anything, it is better. My loaves are still delicious, but with far less effort.
That’s not to say traditional sourdough isn’t worthwhile. I’m certain that one day, when my children are more independent, I may rediscover my love for the process. But for now, I choose convenience.
While this method still requires a long bulk fermentation (natural fermentation takes time!), I have simplified the process to make it easier to follow and to fit into a busy schedule. It’s perfect for beginners who want to bake their first successful sourdough loaf!
Sourdough Starter
First things first, you need a sourdough starter. If you know someone who bakes sourdough, ask for some of their discard. Otherwise, you can buy one or make your own. Creating your own starter is pretty simple but will take a week or more – mine was about three weeks before it was fully active, I believe due to it being winter and having a poorly insulated home. But I really do recommend giving it a go, because you will have a starter that will thrive in your specific home environment. I had a starter that I bought online and it worked great in our previous home that was kept at an ambient 21 degrees celsius most of the time. Then when we moved, it pretty much ceased all activity and I inevitably killed it by accidentally cooking it in the oven while trying desperately to keep it warm!
Sourdough FAQ
Here are some common questions I had when I first started:
Why should I make sourdough?
Homemade bread, sourdough or not, is a much healthier alternative to shop-bought bread, which is often loaded with emulsifiers and preservatives. Sourdough offers additional benefits:
- Easier to digest
- Helps regulate blood sugar
- Contains probiotics that support gut health (yes, some survive baking!)
- More affordable than store-bought loaves, even with high-quality flour
Why is my starter not bubbling/dough not rising?
Cold temperatures – Starters slow down in cooler environments. If your home is cold:
- Try making your own starter – store-bought ones may struggle in a colder setting.
- Use a seedling heat mat with a thermostat (I got mine for ~£30 and it’s cheap to run!).
- Use warm water when feeding your starter and making dough.
You’re keeping your starter in an airtight container – your starter needs oxygen! Cover with a cheesecloth instead.
Your starter is not being fed properly –
- Feed daily at room temperature or weekly if stored in the fridge.
- Feed in a 1:4:4 ratio – starter:flour:water
- Try wholemeal flour to boost sluggish starters – it has more nutrients for the microbes to grow
What flour should I use?
Look for high-protein flour (13-14%). In the UK, most supermarket strong bread flours are below 12%, so check labels! Higher protein flour gives better structure and a rounder loaf. I love Nelstrops (not sponsored) & I buy in bulk directly from them.
How do I know that my dough has been worked enough?
- The dough should be smooth and pull away from the sides of the bowl when mixed at a low-medium speed.
- Perform the window-pane test – stretch a small piece between your fingers. If it’s thin and translucent without tearing, the gluten is well-developed.
How do I know that my dough has sufficiently proved?
- Look for about a 40% rise.
- Try the poke test—gently press the dough. If it springs back slowly, it’s ready. If it springs back too fast, it’s under-proved. No spring back? It’s over-proved.
What if I don’t have a stand mixer?
You can pick up stand mixers pretty cheap second hand, but if it’s not an option for you at this moment in time, this recipe will still be great without. Just use the traditional stretch and fold method until the gluten has properly developed. The rest of the recipe will remain the same.
Tips for Success
- In a cold kitchen, increase starter percentage to speed up fermentation & use warm water.
- Use wet hands when shaping to prevent sticking.
- Batch bake – double the recipe and store extra dough in the fridge for up to 3 days to bake when needed.
- For a better crust, pour a little water between the greaseproof paper and the side of the pot just before putting it in the oven – it should start steaming instantly.
- More water = softer bread, but higher hydration makes dough trickier to handle.
- Trust your senses – sourdough varies more than yeasted bread, so learning by feel is key.
- Bake the dough straight from the fridge – this will help the dough to keep its dome shape.
Step by Step Method
1. Feed your starter no less than 4 hours before using – it should be bubbly and doubled in size.
2. Mix ingredients in stand mixer with a dough hook.
3. Bulk ferment until dough has increased by about 40%.
4. Shape the dough and place it in a floured banneton.
5. Cover and refrigerate overnight for cold proving.
6. Preheat the oven with a Dutch oven inside.
7. Turn out dough onto greaseproof paper, score the top.
8. Bake in the Dutch oven – 30 minutes with the lid on, 10 minutes with the lid off.
Resist the Temptation to Add More Flour
The dough will be very sticky and wet initially but if you have used scales to measure out your ingredients then the dough should be perfect. Adding flour will result in a denser bread.
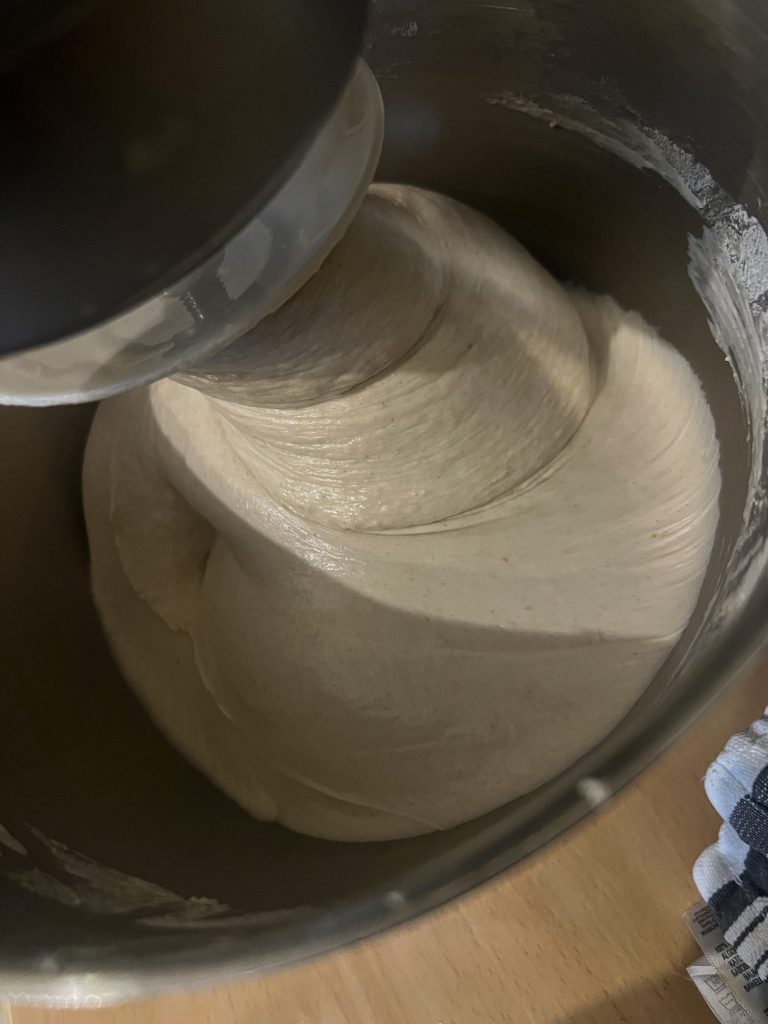
Your dough will look similar to this initially:

Continuing to mix the dough will produce a smooth and elastic dough, which will be a little sticky, but not impossible to work with when you dust with a little flour or use wet hands.
After sufficient time in the mixer, your dough will look something like the image below. Still a little sticky, but it is smooth and should lift from the sides of the bowl when the mixer speed is increased:
24 Hour Sourdough Timeline
This process takes about 24 hours, starting in the morning and baking the next day.
- 8 AM – Mix ingredients in stand mixer (15-30 min). Cover and leave to rise.
- 1-6 PM – Shape, place in a floured banneton, cover, and refrigerate overnight.
Next Morning:
- 7:00 AM – Preheat oven (230°C) with Dutch oven inside.
- 7:20 AM – Turn dough straight from the fridge onto greaseproof paper, score, place in Dutch oven, add water for steam.
- 7:25 AM – Bake (30 min with lid on, 10 min with lid off).
Easy Stand Mixer Sourdough Bread
Equipment
- Stand mixer
- Scales
- Dutch oven Cast iron pot with lid
Ingredients
- 470 g very strong bread flour
- 340 g lukewarm water
- 120 g sourdough starter
- 1 1/4 tsp salt
Instructions
- Measure and mix ingredients in a stand mixer with a dough hook.
- Mix for 15 minutes, checking texture—it should be smooth and pull away from the sides. If not, continue to mix until this is achieved.
- Bulk ferment until 40% increased in size. It takes between 5-10 hours in my ~17-19°C home.
- Shape, place in a floured banneton, cover and refrigerate overnight.
- Preheat oven to 230°C/446°F with a Dutch oven inside.
- Transfer dough straight from fridge onto greaseproof paper, score, and place in the heated Dutch oven.
- Add a splash of water between the paper & the pot to create steam.
- Cover with lid and bake 30 minutes with lid on, 10 minutes with lid off.
Leave a Reply